Graham Dumpleton: Using Apache to start and manage Docker containers.

Now an important aspect of how mod_wsgi daemon process groups work, is that the step of setting up a daemon process groups is separate to the step of saying what WSGI application should actually run in that daemon process group. What this means is that it is possible to tell mod_wsgi to create a daemon process group, but then never actually run a WSGI application in it.

Combining that with the ability of mod_wsgi to load and run a specific Python script in the context of the processes making up a daemon process group when those processes are started, it is actually possible to use a daemon process group to run other Python based services instead and have Apache manage that service. This could for example be used to implement a mini background task execution service in Python allowing you to offload work from the WSGI application processes, with it all managed as part of the Apache instance.

As far as mod_wsgi is concerned it doesn’t really care what the process does though, it will simply create the process and trigger the loading of the initial Python script. It doesn’t even really care if that Python script performs an ‘exec()’ to run a completely different program, thus replacing the Python process with something else. It is this latter trick of being able to run a separate program that we can use to have Apache manage the life of the Docker instance created from our container image.

Quelle: Graham Dumpleton: Using Apache to start and manage Docker containers.
The Hitchhiker’s Guide to Python!

This handcrafted guide exists to provide both novice and expert Python developers a best practice handbook to the installation, configuration, and usage of Python on a daily basis.This guide is opinionated in a way that is almost, but not quite, entirely unlike Python’s official documentation. You won’t find a list of every Python web framework available here. Rather, you’ll find a nice concise list of highly recommended options.

Quelle: The Hitchhiker’s Guide to Python! — The Hitchhiker’s Guide to Python

The Open Guide to Amazon Web Services

A lot of information on AWS is already written. Most people learn AWS by reading a blog or a “getting started guide” and referring to the standard AWS references. Nonetheless, trustworthy and practical information and recommendations aren’t easy to come by. AWS’s own documentation is a great but sprawling resource few have time to read fully, and it doesn’t include anything but official facts, so omits experiences of engineers. The information in blogs or Stack Overflow is also not consistently up to date.

This guide is by and for engineers who use AWS. It aims to be a useful, living reference that consolidates links, tips, gotchas, and best practices. It arose from discussion and editing over beers by several engineers who have used AWS extensively.

Source: The Open Guide to Amazon Web Services

SQLiteOpenHelper with Database on SD card

For certain reasons, e.g. because a database is very big, it might be necessary to put the database on the SD card instead of the internal storage of the phone. Of course, putting the database on the SD card should be carefully thought through because it adds quite a lot of complexity, e.g. by having to deal with the case that the SD card is unmounted or replaced.

Nevertheless, in cases this approach might be appropriate, it is not obvious how to configure the location of the database if you are using SQLiteOpenHelper. The solution is to overwrite the context’s openOrCreateDatabase method. This method is called by SQLiteOpenHelper when it needs to open the actual database.

E.g. you can use the following code to store the database in the applications private folder on the sdcard.

@Override
public SQLiteDatabase openOrCreateDatabase(String name, int mode,
CursorFactory factory) {
    File externalFilesDir = getExternalFilesDir(null);
    if(externalFilesDir == null) {
        return null;
    }

    File dbFile = new File(externalFilesDir, name);
    return SQLiteDatabase.openDatabase(dbFile.getAbsolutePath(), null, SQLiteDatabase.CREATE_IF_NECESSARY);
}

To overwrite this method, you can either inherit from ContextWrapper and then provide the wrapped context to the constructor of SQLiteOpenHelper or you can e.g. provide an own Application class with this overwritten method and then give the application context to the constructor of SQLiteHelper.

Using UIWebView for displaying Rich Text

If you need to display rich text in your iOS application, the easiest way is to use a UIWebView for this. If you have only one or two links in a text, activating link detection in a UITextView might be the fastest way. However, you not always want to display the full link to the user or you might want to structure the text with headings or colors etc. In all these cases, the UIWebView gives you the full power of HTML.

Since integrating the UIWebView is not straight forward for all features, you can find here a summary on how to accomplish this.
Using UIWebView for displaying Rich Text weiterlesen

Android: Displaying Modified Camera Preview Data

If you just want to have the camera preview data under Android without displaying the preview on the screen the problem is that you have to provide a surface to the Camera object for displaying the preview. On some devices it works without, but even the documentation states that you need to to set a preview surface for the camera to work.

Since I did not want to display the real data but only the processed data on the activity, I needed a solution for this problem. My first try was to include a hidden SurfaceView in the layout, but the SurfaceView does not create a surface if it is not visible. This post provided the first hint for solving the problem: You have to include a surface view and set the layout_height and layout_width parameters to „0dip“. This will trigger creation of the surface but the surfave view is virtually invisible.
Unfortunately, when trying this solution with different devices, it turned out that it does not work correctly  on all devices. On some devices the SurfaceView need to have visible size to make the camera preview work.

Finally, what worked on all devices is to overlay the SurfaceView completely with one or more other views so that it is logically visible but the user can not see it. In this way you can easily draw you own processed preview data in a custom view that is hiding the real preview.

Additionally important for further processing of the image data or if you want to display your own preview is that the camera data you get in your preview callback is normally not in RGB but YUV format. If you want to draw the image on a Canvas, you first have to convert the data to RGB, e.g. by using the method you can find described in this post of the Android Developer Forum.

(Interesting sidenote: the YUV format contains the grayscale image in the first width*heigth bytes, so if you just need a grayscale image, no conversion is needed).

Up from API level 8 there is also a YUVImage which you can use to convert the provided data to RGB, see stackoverflow for an example.

iOS View Transition Animation in Wrong Direction

If you transition between two views using an animation e.g. by using the method + transitionFromView:toView:duration:options:completion:, it might be that the animation looks fine if the interface orientation is the standard orientation, e.g.UIInterfaceOrientationPortrait. However, in upside down orientation it can be that the content is displayed correctly, but the transition animation looks like it is not rotated.

The reason for this behavior is that you are trying to transition between subviews of the root view. However, although the coordinate system of the subviews are correctly rotated so that they are displayed in the correct orientation, the root view itself is not rotated. Therefore, the animation on this view is also not rotated.

A possible solution to this problem is to add a new subview into your root view ( with the same size) and move all existing subviews to this new subview so that they are no longer direct children of the root view. Your animated transition is then not applied to the root view but to the new subview and it is therefore correctly rotated.

„Invalid Signature“ problem in iOS apps

If you submit your app to iTunes Connect and shortly afterwards you get back an email from the iTunes store stating that your app has the problem of an invalid signature, here is a possible solution for this problem.

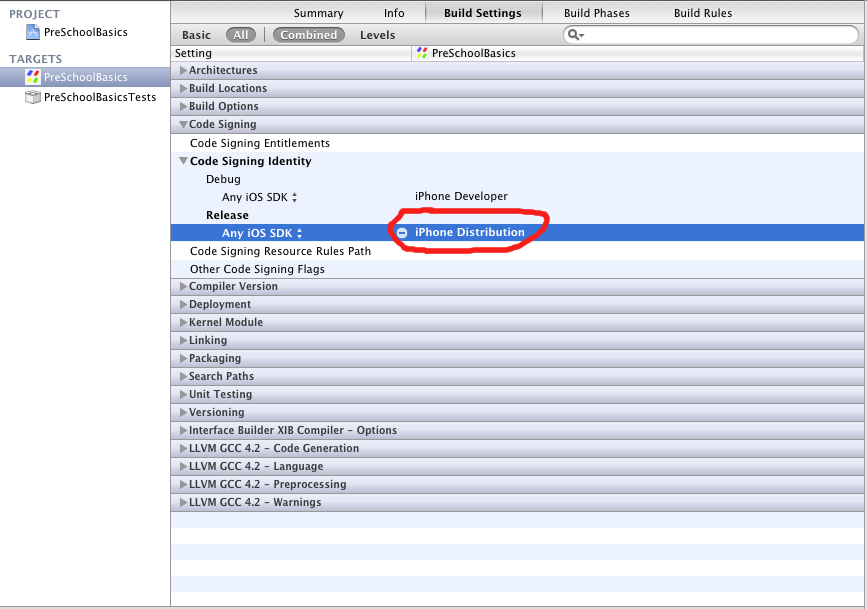
  1. Select the target you want to submit and go to the „Build Settings“ tab.
  2. Locate the category „Code Signing“.
  3. In this category you set the „Code Signing Identity“ for the Release configuration to „iPhone Distribution“.

The screenshot below might help you: