SQLiteOpenHelper with Database on SD card

For certain reasons, e.g. because a database is very big, it might be necessary to put the database on the SD card instead of the internal storage of the phone. Of course, putting the database on the SD card should be carefully thought through because it adds quite a lot of complexity, e.g. by having to deal with the case that the SD card is unmounted or replaced.

Nevertheless, in cases this approach might be appropriate, it is not obvious how to configure the location of the database if you are using SQLiteOpenHelper. The solution is to overwrite the context’s openOrCreateDatabase method. This method is called by SQLiteOpenHelper when it needs to open the actual database.

E.g. you can use the following code to store the database in the applications private folder on the sdcard.

@Override
public SQLiteDatabase openOrCreateDatabase(String name, int mode,
CursorFactory factory) {
    File externalFilesDir = getExternalFilesDir(null);
    if(externalFilesDir == null) {
        return null;
    }

    File dbFile = new File(externalFilesDir, name);
    return SQLiteDatabase.openDatabase(dbFile.getAbsolutePath(), null, SQLiteDatabase.CREATE_IF_NECESSARY);
}

To overwrite this method, you can either inherit from ContextWrapper and then provide the wrapped context to the constructor of SQLiteOpenHelper or you can e.g. provide an own Application class with this overwritten method and then give the application context to the constructor of SQLiteHelper.
Using UIWebView for displaying Rich Text

If you need to display rich text in your iOS application, the easiest way is to use a UIWebView for this. If you have only one or two links in a text, activating link detection in a UITextView might be the fastest way. However, you not always want to display the full link to the user or you might want to structure the text with headings or colors etc. In all these cases, the UIWebView gives you the full power of HTML.

Since integrating the UIWebView is not straight forward for all features, you can find here a summary on how to accomplish this.
Using UIWebView for displaying Rich Text weiterlesen

Great Android Memory Management Links

Here are some great links to get the basics of memory management for Android applications:

Java Performance blog: How to really measure the memory usage of your objects

Android Developers blog: Avoiding memory leaks

Java Performance blog: Eclipse Memory Analyzer, 10 useful tips/articles

Google IO 2011 Session: Memory management for Android Apps

Android: Displaying Modified Camera Preview Data

If you just want to have the camera preview data under Android without displaying the preview on the screen the problem is that you have to provide a surface to the Camera object for displaying the preview. On some devices it works without, but even the documentation states that you need to to set a preview surface for the camera to work.

Since I did not want to display the real data but only the processed data on the activity, I needed a solution for this problem. My first try was to include a hidden SurfaceView in the layout, but the SurfaceView does not create a surface if it is not visible. This post provided the first hint for solving the problem: You have to include a surface view and set the layout_height and layout_width parameters to „0dip“. This will trigger creation of the surface but the surfave view is virtually invisible.
Unfortunately, when trying this solution with different devices, it turned out that it does not work correctly  on all devices. On some devices the SurfaceView need to have visible size to make the camera preview work.

Finally, what worked on all devices is to overlay the SurfaceView completely with one or more other views so that it is logically visible but the user can not see it. In this way you can easily draw you own processed preview data in a custom view that is hiding the real preview.

Additionally important for further processing of the image data or if you want to display your own preview is that the camera data you get in your preview callback is normally not in RGB but YUV format. If you want to draw the image on a Canvas, you first have to convert the data to RGB, e.g. by using the method you can find described in this post of the Android Developer Forum.

(Interesting sidenote: the YUV format contains the grayscale image in the first width*heigth bytes, so if you just need a grayscale image, no conversion is needed).

Up from API level 8 there is also a YUVImage which you can use to convert the provided data to RGB, see stackoverflow for an example.

iOS View Transition Animation in Wrong Direction

If you transition between two views using an animation e.g. by using the method + transitionFromView:toView:duration:options:completion:, it might be that the animation looks fine if the interface orientation is the standard orientation, e.g.UIInterfaceOrientationPortrait. However, in upside down orientation it can be that the content is displayed correctly, but the transition animation looks like it is not rotated.

The reason for this behavior is that you are trying to transition between subviews of the root view. However, although the coordinate system of the subviews are correctly rotated so that they are displayed in the correct orientation, the root view itself is not rotated. Therefore, the animation on this view is also not rotated.

A possible solution to this problem is to add a new subview into your root view ( with the same size) and move all existing subviews to this new subview so that they are no longer direct children of the root view. Your animated transition is then not applied to the root view but to the new subview and it is therefore correctly rotated.

„Invalid Signature“ problem in iOS apps

If you submit your app to iTunes Connect and shortly afterwards you get back an email from the iTunes store stating that your app has the problem of an invalid signature, here is a possible solution for this problem.

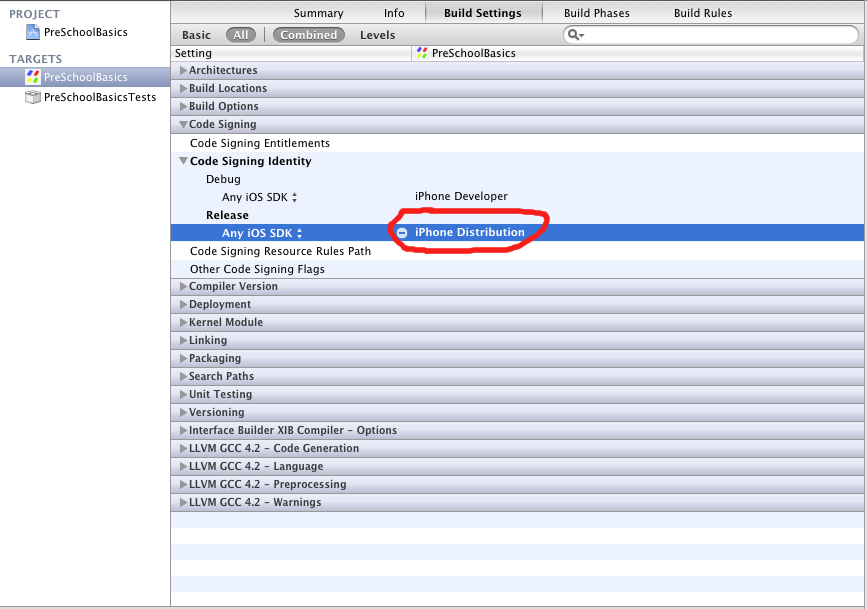
  1. Select the target you want to submit and go to the „Build Settings“ tab.
  2. Locate the category „Code Signing“.
  3. In this category you set the „Code Signing Identity“ for the Release configuration to „iPhone Distribution“.

The screenshot below might help you:

Android: Getting Path to Thumbnail

The standard way on Android to get a thumbnail is to use MediaStore.Images.Thumbnails.getThumbnail or MediaStore.Video.Thumbnails.getThumbnail dependent if you want a thumbnail from an image or an video. Both of these methods return a Bitmap ready to use.

However, sometimes you may want to have the path to the thumbnail, e.g. because your own ContentProvider also need to provide thumbnails for files. The documentation of the thumbnail functionality is not that clear currently, but to build this functionality you can query the standard thumbnail content provider similiar to querying the media store for the real file.

To get the path of a mini thumbnail (MINI_KIND) for the image on the external storage you could do the following:

String getThumbnailPathForLocalFile(long fileId)
{
    Cursor thumbCursor = null;
    try
    {
        thumbCursor = getContext().getContentResolver().
                query(MediaStore.Images.Thumbnails.EXTERNAL_CONTENT_URI
                , null
                , MediaStore.Images.Thumbnails.IMAGE_ID + " = " + fileId+ " AND "
                  + MediaStore.Images.Thumbnails.KIND + " = "
                  + MediaStore.Images.Thumbnails.MINI_KIND , null, null);

        if(thumbCursor.moveToFirst())
        {
            // the path is stored in the DATA column
            int dataIndex = thumbCursor.getColumnIndexOrThrow( MediaStore.MediaColumns.DATA );
            String thumbnailPath = thumbCursor.getString(dataIndex);
            return thumbnailPath;
        }
    }
    finally
    {
        if(thumbCursor != null)
        {
            thumbCursor.close();
        }
    }

    return null;
}

Things to consider:

  • Querying the thumbnail content provider does not trigger the creation of the thumbnail. If the query does not return anything, you should trigger the creation of the thumbnail by calling the appropriate getThumbnail method and then querying the thumbnail content provider again.
  • Getting the path to the thumbnail only works for mini thumbnails (MINI_KIND) because only for these the Android system creates files to store the thumbnail. Micro thumbnails (MICRO_KIND) are stored in the database only. But at least you can get the raw data also by querying the thumbnail content provider as described above.

Interesting Google IO 2011 Sessions

Since I finally found the opportunity to have a look at some Google IO 2011 sessions, here are some links to sessions I can recommend:

Android Development Tools:
Shows some neat tips & tricks for using new (and old) features of the ADT plugin for Eclipse

Android Protips: Advanced Topics for Expert Android App Developers
Provides a lot of great tips and some patterns for common problems, e.g. keeping backward compatibility while still using new features, doing battery efficient data updates, etc.

Memory management for Android Apps
Background information about the garbage collector, memory management in the Dalvik VM and how to find memory problems by using the Eclipse Memory Analyzer

Building Aggressively Compatible Android Games
A good high-level summary of how to make apps compatible for many devices.

Android: Open dynamically created file with ContentProvider

If you have asked yourself how to can return a handle to a temporary file from an own Android ContentProvider implementation, here is a good solution I found at tomgibara.com by utilizing the behavior of the underlying linux file system:

The basic scenario is this: You have implemented a ContentProvider and you want to use it to return something that is too big to fit into a cursor, say an image. It’s clear from the relevant Android platform javadocs, though perhaps not from the general ContentProvider documentation, that this is done by implementing openFile and returning a ParcelFileDescriptor.

But now suppose that the image resource is being rendered on the fly. How do you implement openFile?

As per the contact of openFile you need to return a ParceFileDescriptor which means that the resource must be returned via an open file (or possibly a socket, which we’ll ignore). This means that the image must first be written to a file, which is then opened as a ParceFileDescriptor. The interesting question here is when do you delete the file?

You can’t wait until the calling process has finished reading the file because (a) you won’t get notified when that occurs and (b) it may never exhaust the stream anyway. You can’t rely on the calling process to delete the file for you either, also, the whole idea behind wrapping the resource in this way is to guard it from direct access by other processes. You could delete the file after a fixed time period — assuming that the caller will have finished reading the file by that time. But this is unnecessarily complex, because the answer turns out to be very simple:

You delete the file immediately after you’ve opened the ParcelFileDescriptor but before you return it from the openFile method.

The reason this works is down to the way that Linux filesystems operate: directories maintain links to files, when a process opens a file a new link is created, closing a file or removing it from a directory removes a link. When there are no links to a file, the file is deleted.

So by opening the file in our application, we create a link to it. Then ‘deleting’ the file actually unlinks it, but the file won’t really be deleted until the file descriptor is discarded (ie. the last link is removed). This will happen automatically at some point after the calling application has finished accessing the file and any associated ParcelFileDescriptor objects have become garbage.

Read the full post at Returning dynamically generated resources – Parentheticals & Excursions.